In our last article Shifting Business – Rear Derailleur Discussion, I discussed setting up the rear derailleur. I hope you read it and it helped establish your already growing knowledge of derailleur adjustment. This issue I will discuss the B-Tension adjustment. I’m devoting this article entirely to the matter because B-Tension is not very easy to figure out. This is proven by the wide range of improperly adjusted B-Tension screws I come across. The most important part of this is knowing why it is there and what it does.
What is B-Tension?
B-Tension is an adjustment using that mysterious third screw on the back of your rear derailleur. Its proper adjustment is the final step to clean and quiet shifting. It also provides a degree of chain tension assuming:
- Chain is properly installed and the right length.
- Rear derailleur cage is appropriate length for your chainring, yes chainring, configuration (I.e., 1x, 2x, or 3x) – Fewer chainrings, shorter the cage can be.
- High and low limits properly adjusted .
- Cable tension is properly set.
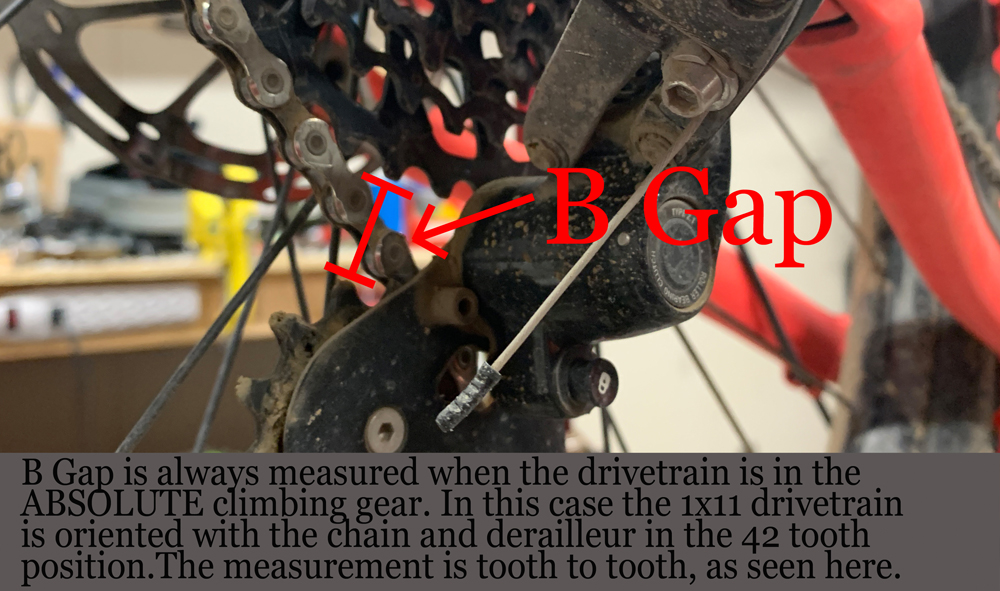
The more B-Tension the derailleur has, the further from the cogs it will naturally sit. This is generally called B-Gap. This allows the chain to have a certain amount of flection as it travels from the upper (jockey) pulley of the derailleur to the cogs. Using larger climbing cogs usually demands a larger B-Gap.
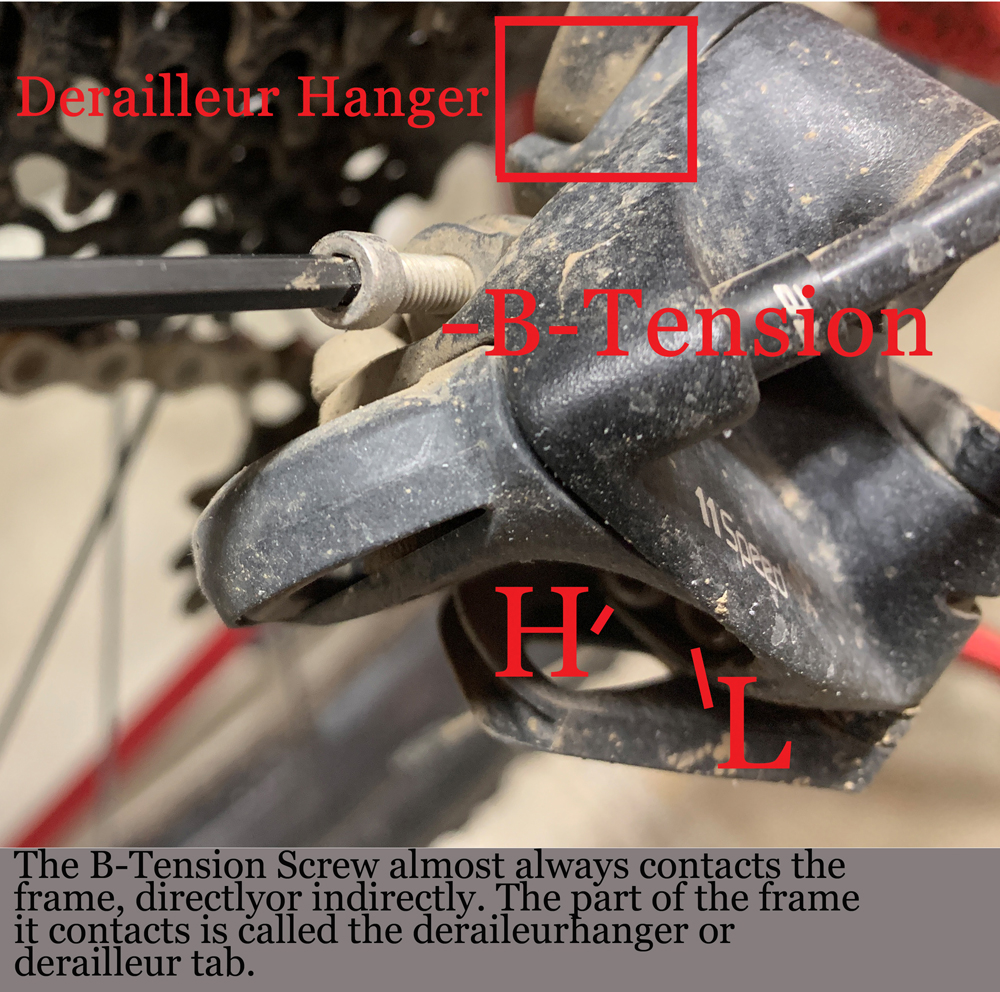
Despite the differences in the derailleur design, B-Tension always performs the same job. It transcends almost all rear derailleurs, except the most inexpensive units. It is not marked by an “L” or “H”. The screw that makes the adjustment either contacts the derailleur hanger either directly or indirectly. Some units are spring loaded – allowing for dynamic chain tension – while others are static.
Locate the B Tension Screw
Almost all rear derailleurs are slightly different in regards to B-Tension location. Finding this screw could be as simple as locating the non-marked screw. Other derailleurs may take guess work. Get to know your derailleur by getting close and inspecting or searching on the internet for specifications.
Identify the Need to Adjust
If the jockey pulley sits too close to the cogs, it will struggle to shift. This is most notable when shifting into the largest cog. The chain is forced into a sharper angle moving from one cog to the next. As the chain bounces around on the edges of the teeth, it misses the shifting ramps of the cassette cogs. And it won’t shift unless it is forced.
Conversely, the gap could be too large and then shifting simply becomes unpredictable and erratic. It worsens when shifting into the smaller cogs. If there is way too much of a gap it will even struggle to get to the smallest cog. One must find the sweet spot.
Double check your “low” limit (covered in previous CW issue) to be sure that the derailleur is actually getting to the lowest cog. If it is, then the B-Tension is likely the culprit. The derailleur may have too large or too small of a B-Gap.
Adjustment
Locate your B Tension adjustment screw and find the correct tool to do the job. (Hint: Phillips head screws usually work better with JIS screwdrivers). My first move is to shift the rear derailleur to the lowest geared cog. Then, supposing there is more than one chainring, shift into the smallest chainring. If there is no B-Gap, the upper derailleur pulley will look like it is dragging on the cog as the chain passes between them. On certain configurations this will make a rumbling sounds as it is pedaled in the work stand.
If there is a gap then back off on the B screw until the derailleur’s upper pulley appears to almost touch the cog. This is your control point. It is where technicians start the B-Tension adjustment process.
From this point progressively turn the B Tension screw 1/2 turn at a time clockwise, or in. Pay close attention to the B-Gap. As the derailleur starts to pull down and away from the cogs, try shifting again. Sometimes, it requires the smallest gap.
If it offers the same result, repeat the steps by adding 1/2 turn at a time. Shift again.
Does chain change gears?
Is it a clean and quick shift?
If so, shift through the range and make sure that all gears are crisp and clean. If you have made a rather large correction to the B-Tension, you may need to adjust your low and high limits, and, possibly, cable tension.
SRAM Rear Derailleurs
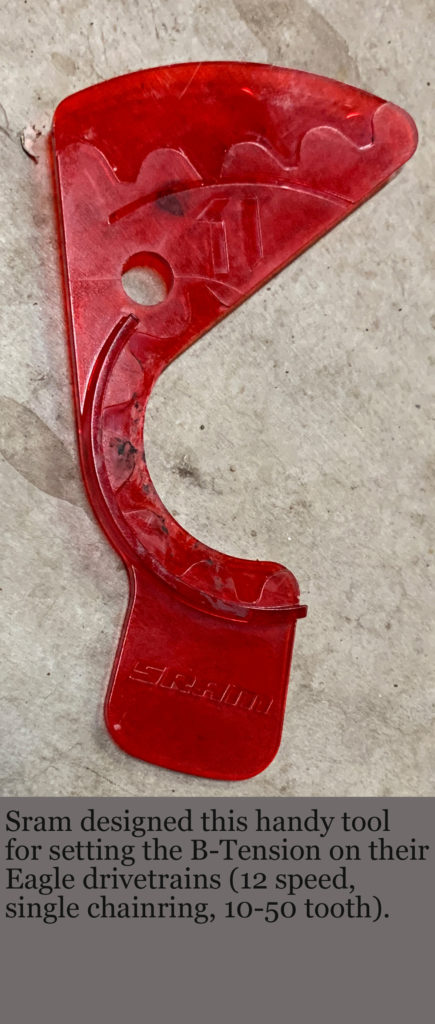
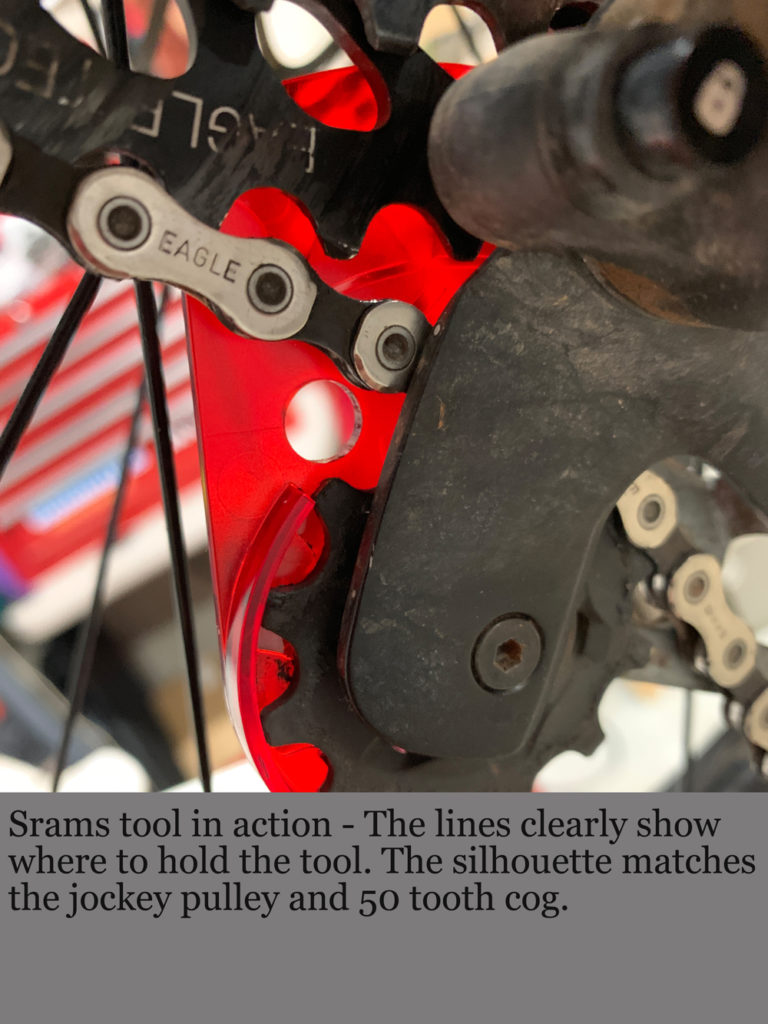
What about SRAM derailleurs? Their road rear derailleurs typically have a 6mm B-Gap. Their 1×11 drivetrains require roughly a 14mm B-Gap. Their 1×12 derailleurs come with a really neat tool. It’s translucent red and fits behind the low gear and upper pulley. Adjust the B Tension to these measurements and it is generally smooth sailing. Depending on mountain bike suspension designs and drivetrain wear, B Tension measurement may vary. Thus, this article is still relevant to SRAM derailleurs.
Be Patient – Don’t Throw Wrenches or Bikes
Working through the shifting and tensioning process can take some time, especially if this is an adjustment you have never done before. The experience of a seasoned wrench may be what you need on this one. But hopefully you have a better picture of why B-Tension is there and what it does for your ride.
Eric has 20 years experience working on bikes, starting in Park City. Today he’s a head technician at a shop and maintains a blog about wrenching and adventures at angrybikemechanic.com





Thank you Eric, great article. However something that is not clear: on a full suspension mtb (and with a SRAM 1 x 11) do I measure the B gap of 14 mm with the bike sitting regularly, or is the gap to be measured when bike is at max sag? If I can get an answer on this I’ll be very happy. Thanks again
Thanks for the feedback Mark. To answer your question, there isn’t a really straight answer that works for all bikes. The most important thing to remember is that you’ll never use the max rear wheel travel when in the climbing cogs. That being said, that derailleur adjustment of 14 mm is most critical for the 3 or 4 largest climbing cogs. It can be a worthwhile endeavor if it makes the shifting better.
So, if you’re going to make this adjustment, I would only do it at about 30%, maybe 40%, sag in the large cog, which is the most common compression level while climbing. Some bikes, like those with Horst Links and Smooth Link designs (Specialized and Rocky Mountain) for example, have so little of this phenomenon, called chain-growth (article coming soon), that taking these steps is unnecessary.
I hope that helps and clarifies this adjustment.
NOTE: don’t try to make the adjustment while the bike is compressed, this runs the risk of bending, or breaking, the b-tension adjustment screw.
Great description. Very clear.
Hi.
I’m looking for a way to adjust the B gap on a bike with no B screw and I’m baffled. It’s not missing or lost, there simply isn’t one there, no hole for it or anything. The RD is marked Shimano SIS and elsewhere, Megarange. It’s a good 10-15 years old and low end of the market, I suspect lower than Altis/Tourney/etc. The upper cog and cage contacts the large chainring when shifting into the lowest gear. The kicker is, it’s only become a problem since changing the gear cable. I just can’t find a way to set the gap at all. Any suggestions?
@Alex Miller – Thank you!
@Sean Thomas – What you’re looking at is a very entry level rear derailleur, found on all sorts of bikes from the Walmart variety to mainline brands kids & comfort bikes. Honestly, I’ve worked on more of these than any other kind! These are very simple derailleurs and will respond to changes with new behavior. There is a good chance that the new cable is too long (supposing the outer casing or housing was also changed). What this does is kick the derailleur forward as if the B-tension screw was backed off all the way. This can also happen if the chain is cut too short on install. Thirdly, and probably more likely, is that after all those years of solid service you may just have a worn out B-spring that can no longer resist the strength and stiffness of the newly installed cable, which may be why it happened at that point. I may recommend replacing it with a speed specific Altus derailleur if that is the case. These have B-tension screws. I really hope this helps. If you end up getting an exact replacement, it should cost you no more than $15 for the part.
Hey Eric, I have recently changed my cassette from an 11-42 to 11-34 and noticed I have a ton of chain slack (on small-small cogs) when I properly adjust the B screw for ~6 mm gap. (the chain should ideally be shorter for the smaller cassette). Is keeping a really large B gap acceptable to maintain the chain tension? I see no problems with shifting. Are there any problems associated with having a large B gap?
@Nick S – Hey, thanks for the question! In an ideal world you’d shorten that chain, and then adjust your b-tension. Over time you will notice a performance degradation in your shifting, as you will likely wear your cassette out a little quicker. The tighter the gap, the more the chain contacts the cassette, spreading the load of pedaling across more gears. Where you will notice that extra length of chain the most, right now, is over bumpy terrain while descending. You will have extra chain slap, but then again today’s derailleurs may make up for that. To answer the question, No, the derailleur and b-tension function were never intended to take up that extra chain slack. I’d recommend shortening the chain. I hope that helps.
Hi Eric,
Need help please!
I rebuilt a 2006 Gary fisher cake for my Daughter cause she outgrew her specialized Safire, I converted the drivetrain from a 3X9 to a 1X10 with a race-face 30 tooth narrow-wide chainring, a SRAM GX 10 speed shifter, a SRAM GX 10 speed medium cage rear mech, and a sunrace 10 speed 11-46 cassette…everything shifts perfectly until it gets to the last two cogs, the 40 tooth and 46 tooth cogs which rub/hit the cage……please advise!! What is the is the remedy for this issue?
@Adrian – Man this is a tough one with no real solution other than buying more gear… so here we go. I have seen this done over and over, even by shops. And the real problem has nothing to do with your adjustments. The GX 10 speed rear derailleur is a far cry from being able to support this type of configuration because it doesn’t have the cage architecture for the necessary chain wrap. Equally unfortunate is the lack of derailleur in the 10 speed market that can actually do this job. The GX 10 wasn’t meant accommodate more than an 11-36t. The other bad news is that this derailleur was designed specifically to work in a 2×10 configuration. Short answer, you may need to get the Sunrace 10 speed derailleur they built for this job. I would consult which ever shop you buy from in order to make the proper purchase.
Long Answer and Theory:
When looking at the jockey pulley (the one that is closest to the cog-set), you can see that the GX 10 is based on a central pivot on the derailleur knuckle. This only allows for a narrow range of articulation to keep the chain traveling within a reasonable gap to the cogs. By the time it gets to the 36tooth cog it’s maximum position, it’s not got a huge gap. When attempting to have this travel up to a 40t and adjust the b-gap accordingly, it’s too far away from the other cogs to do its job correctly. And so, an adjustment is made bringing the jockey pulley closer to the max cog, causing the rub or drag but seemingly shifts fine in the other cogs. Introduce a 46t and the derailleur cannot handle this at all.
Now, some may say that you can add a link of chain. This is only be a bandage fix to get the max cog to work. Unfortunately, at this point we’re into the realm of actual magic if it works. For a time One-Up or Wolf Tooth was making aftermarket derailleur cages that modified the jockey pulley position on some 10 speed derailleurs. I don’t believe they’re doing that anymore, although Wolf Tooth still offers an 11 speed mod for the XTR derailleur. The idea is to put the jockey pulley into a orbital position to that knuckle pivot that can engage more chain and still keep a reasonable b-gap.
I’ve had odd configurations work, well outside the properties of the design function, but after some wear, which doesn’t take long, the shifting goes out the window. Our remedy for this in the past has been to replace the bits with 11 speed Sram hardware.
For me, it is quite necessary to know how to adjust the bike chain on the derailleur. It can save you a few bucks from minor repairs and long-haul dangers. Plus, it even keeps you going even if the leash comes loose. It’s important to carry a handy tool, like the Oumers multi-function bicycle chain tool, and other essentials wherever you go to make repairs easier than ever.
The most practically useful and informative article I’ve come across on B-tension, what it is, what it does, and how it’s adjusted. Thank you.
Been trying to find a solution for a damaged RD hanger “tab” … that flat part of the hanger where the tip of the b-screw hits to create spring tension. That tab on an integrated (aluminum) hanger is damaged to the point where the b-screw just slips right by the tab (I’ve seen so many where they barely hit the tab, and this one totally misses). Is there any solution to repair that tab? I’m getting close to using epoxy to afix a small washer or SOMETHING for the screw to hit. (This is on a child’s bike of a friend who cannot afford a better bike, nor a frame re-welding). I’m just trying to create a hack for it to work and allow shifting again.
I was glad to find this article as I never understood the functions of B screw from other sites. Thanks !
Comments are closed.